Getting Ready for Development
Assuming you read the previous sections and obtained a basic understanding of how everything works, in this section we will provide all necessary configurations you have to follow before you start play-testing around the Login service.
1. Local SQL Server
First you need to create a local SQL Server.
There are two options to install a local SQL Server on your machine.
One is to download and install separately from an SQL Server monitoring tool (e.g.: SQL Server Management Studio (SSMS)).
A local SQL Server is created automatically when installing the required packages via Visual Studio Installer.
The easiest way to create an local SQL Server is by installing the required packages.
Hint
Another way to do so is with SQL Server Management Studio (SSMS).
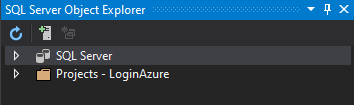
Then, you can manage the SQL Connection to the LocalDB through Visual Studio 2022.
To do so, click on the top toolbar View and then click on Sql Server Object Explorer.
This will open a panel as follows:
On the top bar click on the Add SQL Server button and add select from the Local list the LocalDB SQL Server as in the figure below:
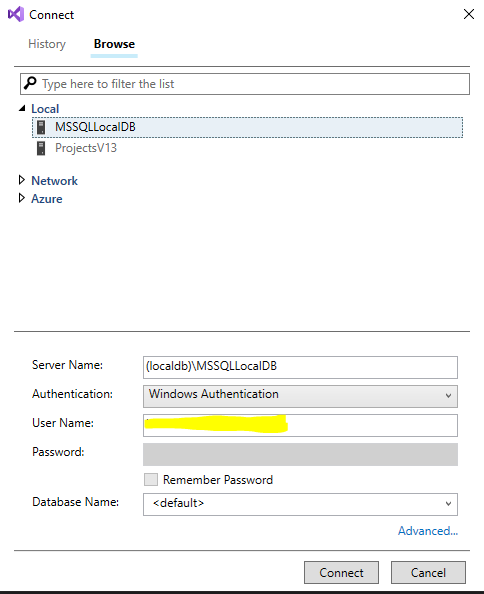
Click connect and proceed to expand the SQL Server tree structure on the SQL Server Object Explorer as follows:

Right click on the Databases icon and select the Add New Database option.

Give a descriptive name for your Database (something like IdentityDb) and click Ok.
Now you have created your Database but it is empty. Don’t worry we will populate it soon, keep reading!
2. App Settings
DB Connection String
After the database is set you need to obtain the connection string.
The easiest to obtain the connection string is through the SQL Server Object Explorer.
Right-click on the database and select properties, then on the Properties window you will find the Connection String as in the figure below.
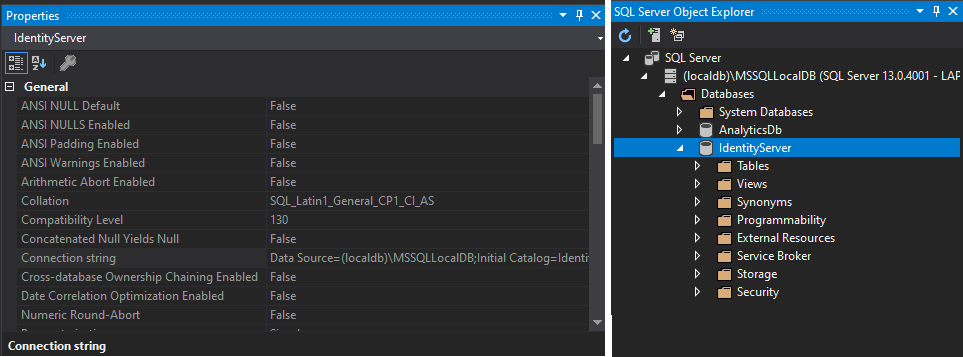
Proceed to open the file appSettings.Development.json and paste it inside the Connection Strings/Identity as in the example snippet below:
"ConnectionStrings": {
    "Identity": "Data Source=(localdb)\\MSSQLLocalDB;Initial Catalog=IdentityServer;Integrated Security=True;Connect Timeout=30;Encrypt=False;TrustServerCertificate=False;ApplicationIntent=ReadWrite;MultiSubnetFailover=False"
}
Note
The connection string should be the same as the one you copied from the SQL Server Object Explorer, but with the Initial Catalog changed to the name of the database you created.
Important
Ensure that Encrypt and TrustServerCertificate are set to False.
This is important for the development environment.
Email Configuration
While in the appSettings.Development.json file, proceed to also include the configuration for your EmailService.
This is needed for user account operations that necessitate sending an email to the User.
For instance, forgot password functionality.
"EmailConfiguration": {
  "SmtpServer": "",
  "SmtpPort": 587,
  "SmtpUsername": "",
  "SmtpPassword": "",
  "PopServer": "",
  "PopPort": 995,
  "PopUsername": "",
  "PopPassword": ""
}
Important
The Email Configuration is set to empty by default. You need to fill in the fields with your email provider’s configuration.
If you need to configure extra TLS or other security options, you can do so in the EmailService.cs file under Services/ directory.
Optional Step. You can configure the email from, subject, and content fields in the AccountController and UsersController, where the EmailService is invoked and Emails are sent.
3. (HTTPS) Self-signed Certificate
Now that all configurations are set, we need to set a self-signed developer certificate before running our service.
This is because IdentityServer4 by default prompts to encrypted traffic (HTTPS) and in production won’t work otherwise.
So for development purposes, Visual Studio and IIS will generate a self-signed certificate for us.
First, click on the arrow next to IIS (run) and click on the LoginAzure Debug Properties option.
Scroll down and make sure the Use SSL checkbox is ticked! If it is not, check it.
Note
This is also the default development environment endpoint to access the service https://localhost:44355.
When you check it for the first time, a window prompt will appear asking you to create a self-signed certificate that will be stored on your computer.
Click Agree on all dialogs, and you are set!
4. Start the Service
Assuming you followed all previous steps successfully and everything is set, you are ready to hit the start button.
Note
Make sure IIS profile is selected and that Debug mode is set on the top bar.
Hitting the Start button will fire up Login service at the specified endpoint in Step 3.
https://localhost:44355
When you point your browser the first time at this URL, it might be a bit slower than expected. This happens mainly due to two reasons:
ASP.NET Core slow-start
The
SeedDataHelper.csscript will be invoked and subsequently:2.1. Will ensure all Tables are initialized.
2.2. Migrations are applied.
2.3. First dummy data will be inserted to the database.
After this cold start you will be navigated to the Login page. Login with one of the predefined users at SeedDataHelper.cs and then you can go back to the Home page and see the default page of IdentityServer4 which is useful for debugging user claims, etc.
Note
The Default HomePage of IdentityServer4 is only for the development environment. This page will not be visible when you deploy to Azure.
If everything went fine at this point, you are set. Most likely you won’t experience any strange behaviors.
Note
Make sure you test thoroughly all supported functionality (e.g., registration page, forgot password, etc.).